
Introduction
The Asset Management Database (AMDB) is a comprehensive tool designed for tracking and managing inspection data related to pressure vessels, piping systems, tanks, PSV (Pressure Safety Valves), and critical components. This database allows inspectors to log, query, and manage inspection schedules, inspection reports, and asset documentation in a structured and efficient manner.
By integrating with the API Toolbox, the AMDB ensures seamless data entry, retrieval, and analysis across various inspection assets. This section is divided into Tier I and Tier II levels:
- Tier II Level: A detailed view for individual vessel data entry, including specifications, inspections, and supporting documentation.
- Tier I Level: Displays all PV assets within a selected Client, Location, and Unit.
Accessing the Tool
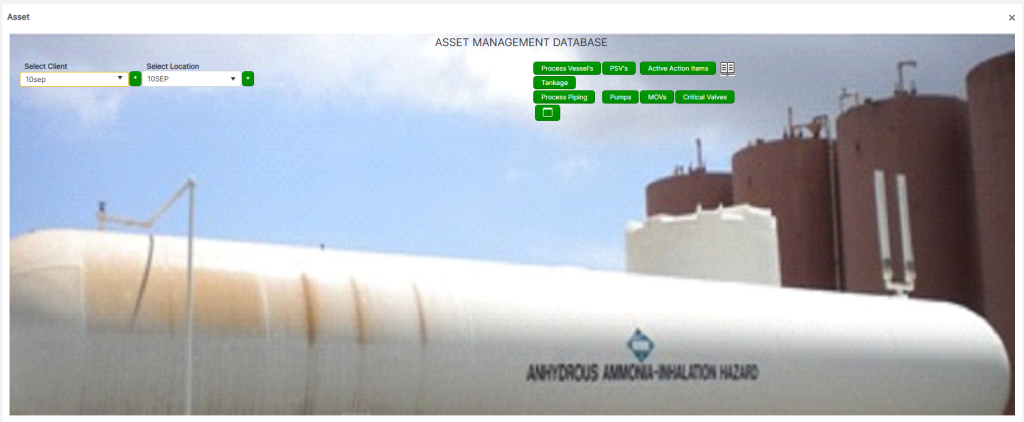
To access the Asset Management Database, follow these steps:
- Open the API Inspectors Toolbox.
- Click on the [Asset Management] tab.
- Select Client and Location from the dropdown menus.
- If a new client or location needs to be added, click on the [*] button next to Client or Location, then click the [+] icon and enter the details in the pop-up window.
- Click [Save] to confirm the addition.
- Choose the asset type you want to manage:
- Pressure Vessels
- PSV’s (Pressure Safety Valves)
- Tankage (Aboveground Storage Tanks – AST)
- Piping (PPG)
- Pump/MOVs/Critical Valves (PMC)
Once the asset type is selected, users are directed to the Tier I page, where asset units are displayed.
Tier I Level – Asset Selection & Overview
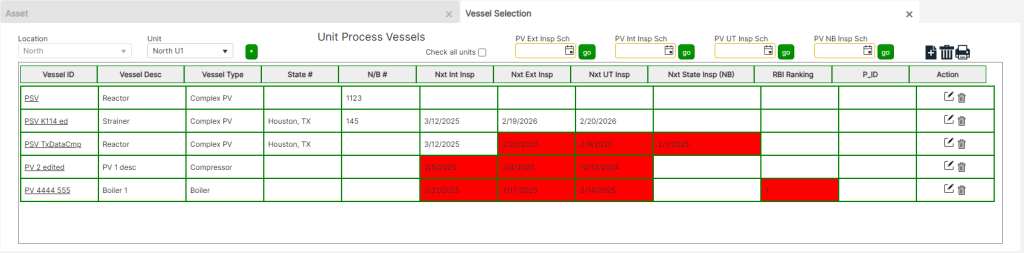
The Tier I level of the Asset Management Database (AMDB) serves as the main interface for managing assets under a selected Client and Location. This page allows users to select existing units, add new units, and manage Pressure Vessel (PV) Assets through multiple entry methods.
Selecting or Adding a Unit
Once at the Tier I level, users must select the Unit of interest from the dropdown menu.
- To enter a new unit, click on the [*] button next to the dropdown.
- Enter the new unit name in the Vessel Units cell.
- Click the Save icon to confirm the addition.
Available Functions & Icons
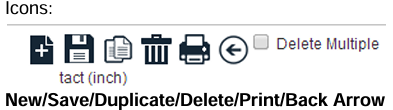
The Tier I page includes several action icons for asset management:
- New – Adds a new record.
- Save – Saves any changes made to the asset database.
- Duplicate – Creates a copy of an existing record.
- Delete – Removes an entry from the database.
- Print – Generates a printable report.
- Back Arrow – Returns to the previous page.
Tier II Level – Asset Entry & Management
Once an asset is selected from Tier I, users enter Tier II, where detailed data entry and management occur. The Tier II level includes comprehensive forms and document management tools to track individual asset records, inspections, and associated documentation.
Pressure Vessels (PV) Assets
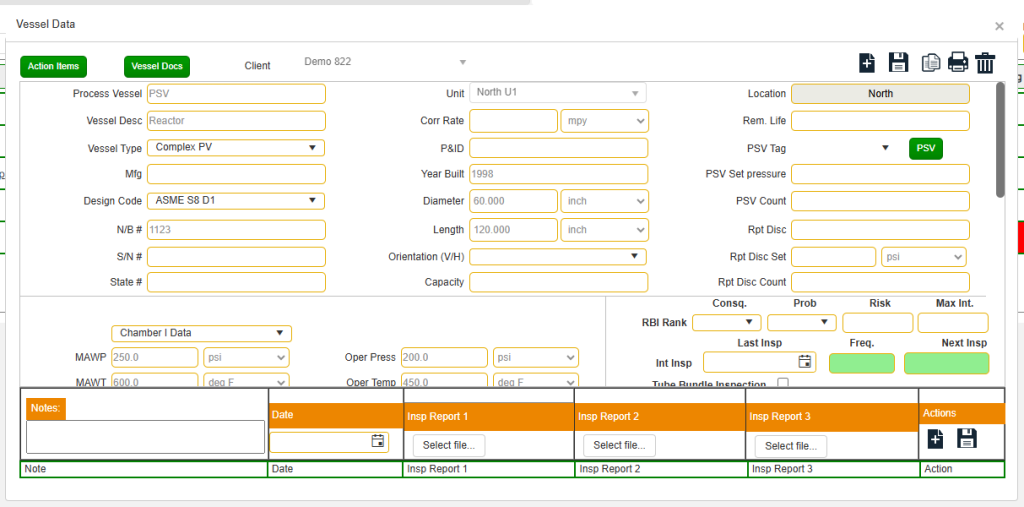
Users have four primary options for entering Pressure Vessel (PV) asset data into the Asset Management Database (AMDB):
- Single Entries: Users can manually add a new PV asset by navigating to Tier I and clicking the [+] icon located at the top right of the page. This action opens the Tier II vessel data page, where users must fill in all required fields related to the PV asset, such as diameter, length, manufacturer, national board (NB) number, and other specifications.
- Importing an Excel Spreadsheet: Users can efficiently bulk upload PV assets by clicking the [Export] button from the Tier I level, which generates an Excel spreadsheet. Users can populate the sheet by copying and pasting data from pre-existing spreadsheets or manually entering asset details under appropriate column headers. Once complete, users must click [Select File] on the Tier I PV Asset page and then [Import] to upload the data into the database. Upon successful import, all listed PV assets will populate under Tier I rows.
- Report Entries: Users can also add PV assets by utilizing Report Builders within the system. By clicking on the [Add Asset to the AMDB] button found in one of the three Report Builders, relevant data is automatically transferred into the database. After selecting the appropriate Client, Location, and Unit from the drop-down menus, users must click [Add Asset]. The asset will now be visible in the AMDB under the selected Client/Location/Unit, where additional data can be entered as required in Tier II.
- Duplicating a Record: If an existing PV asset closely resembles a new entry, users can quickly duplicate a record by clicking the duplicate icon within Tier II. This function generates an identical data page, but users must modify the Process Vessel ID nomenclature (displayed at the top-left of the first column) and adjust any other necessary fields. This method should only be used for PVs with similar specifications to the source PV.
Inspection and Data Management
- Inspection Queries: Users can determine the next due External or Internal inspections by entering a target year (e.g., inputting 01/01/2017 to check inspections due in 2016) in the designated date cell at the top of the Tier I page. Clicking [Go] generates the next Ultrasonic Thickness (UT) inspection schedule, displaying both External and Internal Queries. Checking [All Units] before clicking [Go] allows users to retrieve inspection data for all PV assets at the specified location.
- Accessing Tier II Data: From the Tier I page, clicking on a Vessel ID takes users to Tier II, where they can view or modify detailed asset information.
- Action Items: Clicking the [Action Item] button enables users to log any maintenance or inspection-related tasks. For an item to appear in the Active Action Item Query, the Approved checkbox must be selected.
- Document Management: The [Vessel Docs] button allows users to upload and manage essential PV-related documentation, including:
- Design datasheets
- Manufacturing modifications
- Engineering drawings
- Compliance records
Users can add new documents by clicking [Add Record], selecting [Choose File], entering relevant details in the notes section, and clicking [Save]. Clicking the X button exits the document manager, returning to the Tier II page.
PSV Integration
- Viewing Existing PSV Data: Users can access PSV records by selecting the relevant PSV from a dropdown and clicking the [PSV] button, which opens the PSV Data Page.
- Adding a New PSV Entry: Users can create new PSV records directly from the Tier II PV Page by clicking the [PSV] button and entering all required details.
- Editing and Modifying PSV Data: The PSV data page allows for easy updates and modifications as required.
- Inspection Report Management: A document storage library is provided at the bottom of the Tier II PV Page, where users can upload and manage inspection reports for the asset.
Best Practices for PV Inspections
Users should always update inspection dates and frequencies during every inspection cycle to maintain an accurate database record. Keeping track of upcoming inspections, maintenance tasks, and compliance documents ensures proper asset management and regulatory compliance.
Pressure Safety Relief (PSV) Assets
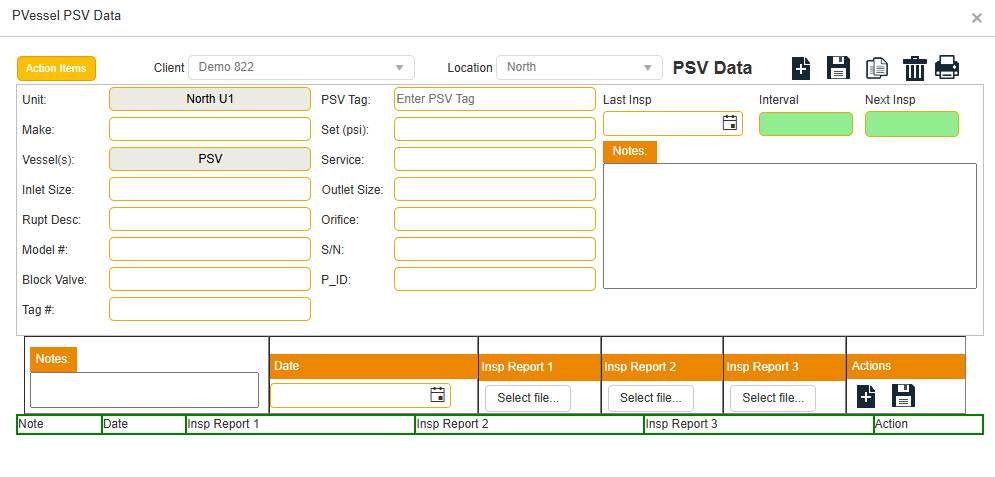
Figure AM-4: Tier II Page (PSV data page)
Users have two primary options for entering Pressure Safety Relief (PSV) asset data into the Asset Management Database (AMDB):
- Adding a New PSV from the PV Tier II Page: If a PSV is associated with a Pressure Vessel (PV), users can navigate to the Tier II level of the PV asset and select the PSV of interest from the drop-down menu. Clicking on the [PSV] button next to it will take the user to the Tier II PSV data page, where details for the selected PSV can be reviewed or modified. If no PSV records exist for the PV, clicking the [PSV] button will open a new PSV data page, allowing users to enter required data for the asset.
- Duplicating an Existing PSV Record: If a PSV asset shares similar specifications with another PSV, users can clone the record by selecting the duplicate icon from the Tier II PSV data page. However, to ensure proper asset differentiation, users must modify the PSV Tag ID nomenclature (displayed at the top of the second column) and update any other necessary details. This duplication method is only recommended for PSV assets linked to the same PV as the original source PSV.
Managing PSV Assets at Tier I Level
- Selecting PSV Assets: After selecting a Client and Location, users must click the [PSV’s] button, which will navigate them to the Tier I PSV asset page.
- Querying Next Due PSV Inspections: Users can determine upcoming PSV inspections by entering a future inspection date (e.g., inputting 01/01/2017 to check inspections due in 2016) in the appropriate date cell at the top of the Tier I page. Clicking [Go] generates a list of PSVs due for inspection. Checking [All Units] before clicking [Go] allows users to retrieve inspection data for all PSV assets at the specified location.
- Accessing Tier II Data: From the Tier I page, clicking on a PSV Tag takes users to Tier II, where they can view or modify detailed PSV asset information.
PSV Data Entry and Inspection Management
- Data Entry: Once in the Tier II PSV data page, users must enter relevant information into the designated fields.
- Notes Section: Users can input any additional details related to the PSV in the notes box.
- Action Items: Clicking the [Action Item] button allows users to log maintenance or inspection-related tasks. For an item to appear in the Active Action Item Query, the Approved checkbox must be selected.
- PSV Specification and Inspection Report Management: At the bottom of the Tier II PSV data page, users can upload and manage essential documents such as:
- PSV specifications
- Compliance records
- Inspection reports
New reports can be added by entering relevant notes, selecting [Choose File], locating the appropriate report file, and clicking [Save]. The most recent two reports are displayed by default, while older records can be accessed by scrolling through the stored files.
Best Practices for PSV Inspections
Users should always update inspection dates and frequencies during every inspection cycle to ensure proper database accuracy. Keeping track of upcoming PSV inspections, maintenance tasks, and compliance documentation ensures that all assets remain in regulatory compliance.
Tankage (AST) Assets
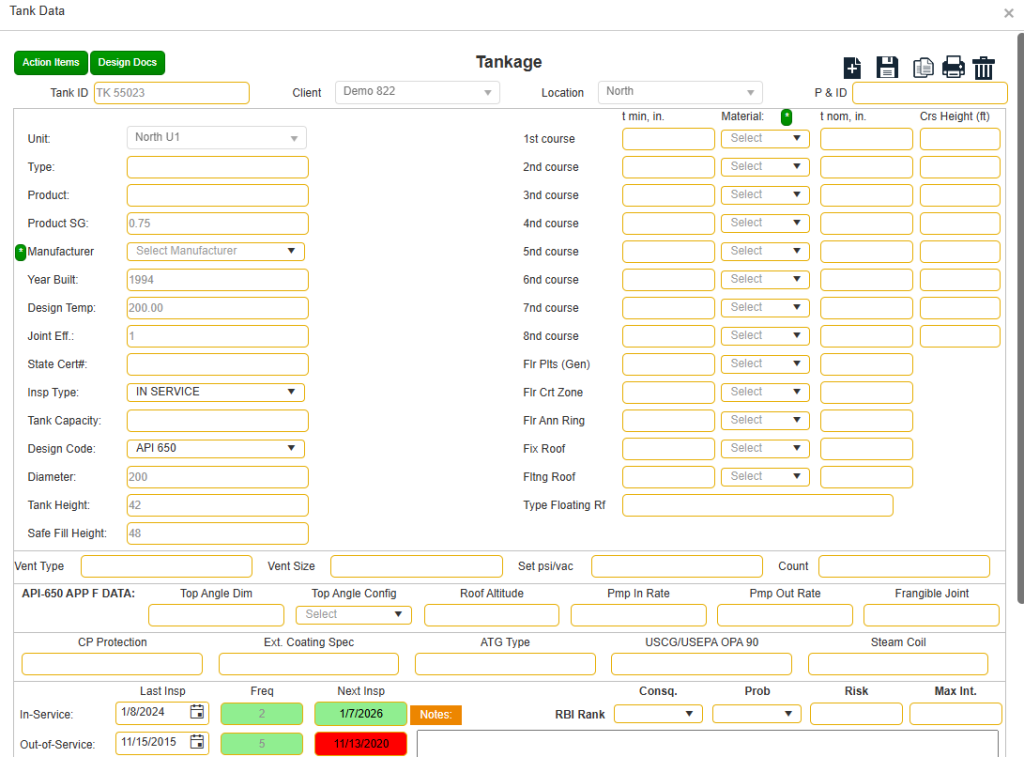
Figure AM-5: Tier II Page (AST data page)
Users have four primary options for entering Tankage (AST) asset data into the Asset Management Database (AMDB):
- Single Entries: Users can manually add a new AST asset by navigating to Tier I and clicking the [+] icon located at the top right of the page. This action opens the Tier II AST data page, where users must fill in all required fields related to the AST asset, such as diameter, length, manufacturer, and other specifications.
- Importing an Excel Spreadsheet: Users can efficiently bulk upload AST assets by clicking the [Export] button from the Tier I level, which generates an Excel spreadsheet. This file can be saved locally, and users can populate the sheet by copying and pasting data from pre-existing spreadsheets or manually entering asset details under appropriate column headers. Once complete, users must click [Select File] on the Tier I AST Asset page and then [Import] to upload the data into the database. Upon successful import, all listed AST assets will populate under Tier I rows.
- Report Entries: Users can also add AST assets by utilizing Report Builders within the system. By clicking on the [Add Asset to the AMDB] button found in one of the three Report Builders, relevant data is automatically transferred into the database. After selecting the appropriate Client, Location, and Unit from the drop-down menus, users must click [Add Asset]. The asset will now be visible in the AMDB under the selected Client/Location/Unit, where additional data can be entered as required in Tier II.
- Duplicating a Record: If an existing AST asset closely resembles a new entry, users can quickly duplicate a record by clicking the duplicate icon within Tier II. This function generates an identical data page, but users must modify the Tank ID nomenclature (displayed at the top-left of the first column) and adjust any other necessary fields. This method should only be used for ASTs with similar specifications to the source AST.
Inspection and Data Management
- Inspection Queries: Users can determine the next due External, Internal, or UT inspections by entering a target year (e.g., inputting 01/01/2017 to check inspections due in 2016) in the designated date cell at the top of the Tier I page. Clicking [Go] generates the next inspection schedule. Checking [All Units] before clicking [Go] allows users to retrieve inspection data for all AST assets at the specified location.
- Accessing Tier II Data: From the Tier I page, clicking on an Equipment ID takes users to Tier II, where they can view or modify detailed asset information.
- Action Items: Clicking the [Action Item] button enables users to log any maintenance or inspection-related tasks. For an item to appear in the Active Action Item Query, the Approved checkbox must be selected.
- Document Management: The [Vessel Docs] button allows users to upload and manage essential AST-related documentation, including:
- Design datasheets
- Manufacturing modifications
- Engineering drawings
- Compliance records
Users can add new documents by clicking [Add Record], selecting [Choose File], entering relevant details in the notes section, and clicking [Save]. Clicking the X button exits the document manager, returning to the Tier II page.
AST Inspection Report Management
- A document storage library is provided at the bottom of the Tier II AST Page, where users can upload and manage inspection reports for the asset.
- New reports can be added by entering relevant notes, selecting [Choose File], locating the appropriate report file, and clicking [Save].
- The most recent two reports are displayed by default, while older records can be accessed by scrolling through the stored files.
Best Practices for AST Inspections
Users should always update inspection dates and frequencies during every inspection cycle to maintain an accurate database record. Keeping track of upcoming inspections, maintenance tasks, and compliance documents ensures proper asset management and regulatory compliance.
Piping (PPG) Assets
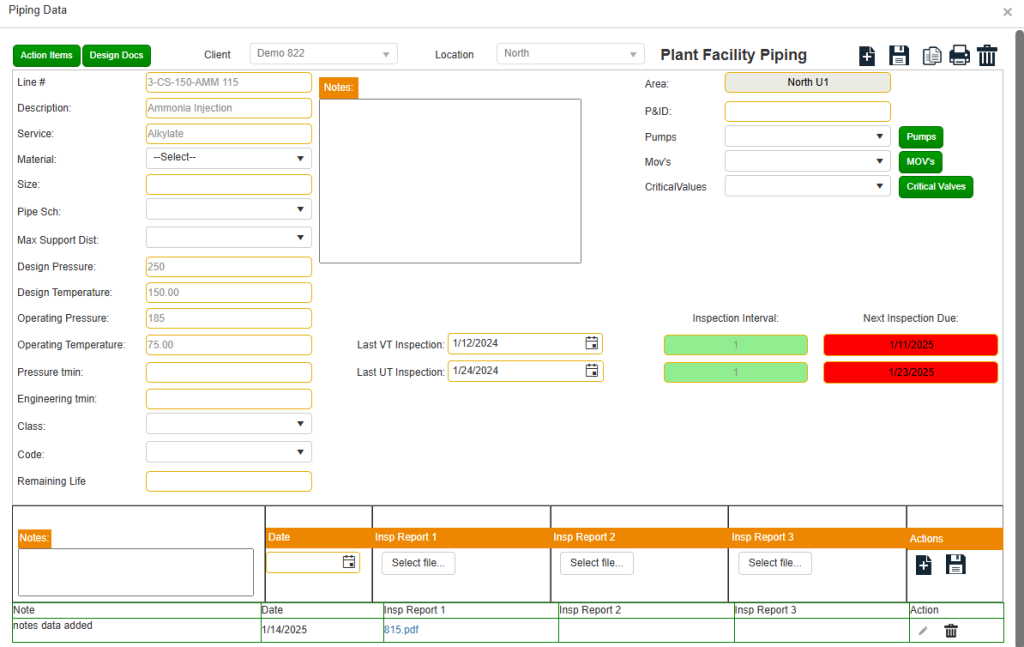
Users have four primary options for entering Piping (PPG) asset data into the Asset Management Database (AMDB):
- Single Entries: Users can manually add a new PPG asset by navigating to Tier I and clicking the [+] icon located at the top right of the page. This action opens the Tier II PPG data page, where users must fill in all required fields related to the PPG asset, such as diameter, circuit, material, and specifications.
- Importing an Excel Spreadsheet: Users can efficiently bulk upload PPG assets by clicking the [Export] button from the Tier I level, which generates an Excel spreadsheet. This file can be saved locally, and users can populate the sheet by copying and pasting data from pre-existing spreadsheets or manually entering asset details under appropriate column headers. Once complete, users must click [Select File] on the Tier I PPG Asset page and then [Import] to upload the data into the database. Upon successful import, all listed PPG assets will populate under Tier I rows.
- Report Entries: Users can also add PPG assets by utilizing Report Builders within the system. By clicking on the [Add Asset to the AMDB] button found in one of the three Report Builders, relevant data is automatically transferred into the database. After selecting the appropriate Client, Location, and Unit from the drop-down menus, users must click [Add Asset]. The asset will now be visible in the AMDB under the selected Client/Location/Unit, where additional data can be entered as required in Tier II.
- Duplicating a Record: If an existing PPG asset closely resembles a new entry, users can quickly duplicate a record by clicking the duplicate icon within Tier II. This function generates an identical data page, but users must modify the Circuit ID nomenclature (displayed at the top-left of the first column) and adjust any other necessary fields. This method should only be used for PPGs with similar specifications to the source PPG.
Inspection and Data Management
- Inspection Queries: Users can determine the next due VT or UT inspections by entering a target year (e.g., inputting 01/01/2017 to check inspections due in 2016) in the designated date cell at the top of the Tier I page. Clicking [Go] generates the next inspection schedule. Checking [All Units] before clicking [Go] allows users to retrieve inspection data for all PPG assets at the specified location.
- Accessing Tier II Data: From the Tier I page, clicking on a Line/Circ ID takes users to Tier II, where they can view or modify detailed asset information.
- Action Items: Clicking the [Action Item] button enables users to log any maintenance or inspection-related tasks. For an item to appear in the Active Action Item Query, the Approved checkbox must be selected.
- Document Management: The [Vessel Docs] button allows users to upload and manage essential PPG-related documentation, including:
- Design datasheets
- Manufacturing modifications
- Engineering drawings
- Compliance records
Users can add new documents by clicking [Add Record], selecting [Choose File], entering relevant details in the notes section, and clicking [Save]. Clicking the X button exits the document manager, returning to the Tier II page.
PPG Inspection Report Management
- A document storage library is provided at the bottom of the Tier II PPG Page, where users can upload and manage inspection reports for the asset.
- New reports can be added by entering relevant notes, selecting [Choose File], locating the appropriate report file, and clicking [Save].
- The most recent two reports are displayed by default, while older records can be accessed by scrolling through the stored files.
Integration with PMC (Pumps, MOVs, and Critical Valves)
- Users can modify or create a new PMC record as needed.
- Detailed PMC entry instructions are covered in the PMC Assets section.
Best Practices for PPG Inspections
Users should always update inspection dates and frequencies during every inspection cycle to maintain an accurate database record. Keeping track of upcoming inspections, maintenance tasks, and compliance documents ensures proper asset management and regulatory compliance.
Pumps, MOVs, and Critical Valves (PMC) Assets
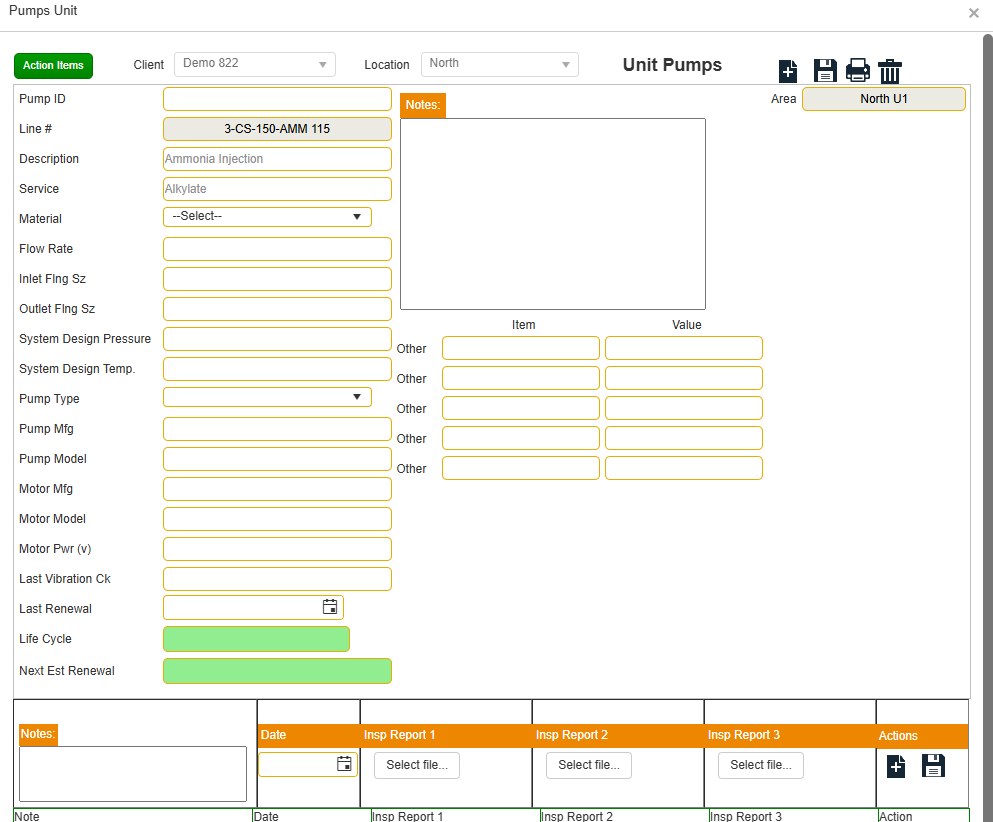
Users have two primary options for entering Pumps, MOVs, and Critical Valves (PMC) asset data into the Asset Management Database (AMDB):
- Adding a New PMC from the PMC Tier II Page: Users can navigate to the Tier II level of the PMC Asset of interest and select the PMC from the drop-down menu. Clicking on the PMC button next to it will take the user to the Tier II PMC data page, where details for the selected PMC can be reviewed or modified. If no PMC records exist for the asset, clicking the PMC button will open a new PMC data page, allowing users to enter required data for the asset.
- Duplicating an Existing PMC Record: If a PMC asset shares similar specifications with another PMC, users can clone the record by selecting the duplicate icon from the Tier II PMC data page. However, to ensure proper asset differentiation, users must modify the PMC ID nomenclature (displayed at the top of the first column) and update any other necessary details. This duplication method is only recommended for PMC assets linked to the same PPG as the original source PMC.
Managing PMC Assets at the Tier I Level
- Selecting PMC Assets: After selecting a Client and Location, users must click the PMC Asset button of interest, which will navigate them to the Tier I PMC asset page.
- Querying Next Estimated Renewal: Users can determine the next estimated renewal of the PMC by entering a future date (e.g., inputting 01/01/2017 to check renewals due in 2016) in the appropriate date cell at the top of the Tier I page. Clicking [Go] generates a list of PMCs due for renewal. Checking [All Units] before clicking [Go] allows users to retrieve renewal data for all PMC assets at the specified location.
- Accessing Tier II Data: From the Tier I page, clicking on a PMC ID takes users to Tier II, where they can view or modify detailed PMC asset information.
PMC Data Entry and Inspection Management
- Data Entry: Once in the Tier II PMC data page, users must enter relevant information into the designated fields.
- Notes Section: Users can input any additional details related to the PMC in the notes box.
- Action Items: Clicking the [Action Item] button allows users to log maintenance or inspection-related tasks. For an item to appear in the Active Action Item Query, the Approved checkbox must be selected.
- PMC Specification and Inspection Report Management: At the bottom of the Tier II PMC data page, users can upload and manage essential documents such as:
- PMC specifications
- Compliance records
- Inspection reports
New reports can be added by entering relevant notes, selecting [Choose File], locating the appropriate report file, and clicking [Save]. The most recent two reports are displayed by default, while older records can be accessed by scrolling through the stored files.
Best Practices for PMC Asset Renewal and Maintenance
Users should always update renewal dates and frequencies during every maintenance cycle to ensure proper database accuracy. Keeping track of upcoming PMC renewals, maintenance tasks, and compliance documentation ensures that all assets remain in regulatory compliance.
Active Action Items Query
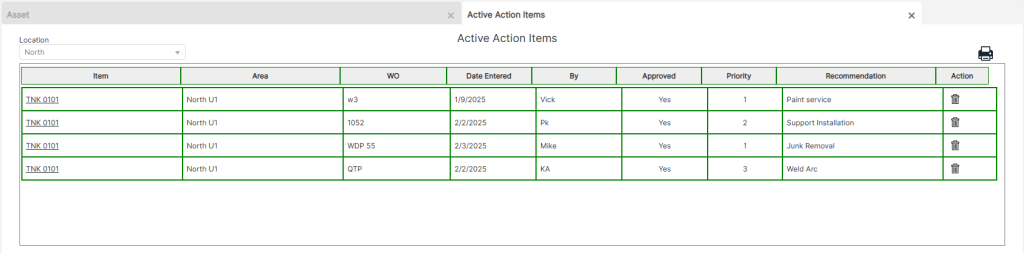
The Active Action Items Query provides a centralized list of pending corrective actions. Action items for that location will be listed according to priority and date of entry for all action items that have the approval check box checked when entering the action items in the data page associated with the asset of interest.
- Navigating to Active Action Items: After selecting a Client and Location, users must click on the [Active Action Items] button. This action directs them to the Tier I level page, where all active action items for the selected location are displayed.
- Prioritization and Entry Date: Action items are listed in order of priority and entry date, ensuring that urgent tasks are easily identifiable. Only action items with the Approved checkbox selected during data entry will appear in the active list.
- Marking Action Items as Completed: Once an action item has been addressed, users can remove it from the Active Action Items list. To do so, navigate to the relevant asset’s action item page, locate the specific item, check the Completed box, and enter the completion date.
By systematically tracking action items, updating their statuses, and ensuring completed tasks are recorded, users can maintain an organized and efficient asset management workflow.
User Actions & Navigation
User Actions
- Add New Assets – Create a new record for pressure vessels, PSVs, tanks, or pipelines.
- Attach Inspection Reports – Store previous inspections for reference.
- Track Inspection Due Dates – Query next due dates for UT, VT, and pressure testing.
- Duplicate Existing Assets – Clone asset records for similar equipment.
- Enter Action Items – Log and approve action items that require follow-up.
- Upload Supporting Documents – Store datasheets, modifications, and design drawings.
Navigation
- Tier I Level – Provides an overview of all assets at a selected location.
- Tier II Level – Offers in-depth details for individual assets.
- Action Items Section – Lists pending corrective actions across all asset types.
- Inspection Query – Allows users to search for upcoming inspections.
Final Steps
Once all data has been entered:
- Click Save to store all progress.
- Upload Reports generated from the HUB to the assets.
- Navigate to the Asset List to verify the updated status.