
Overview
The Report Builder was designed to simplify and allow for consolidation of several Cases from various analysis tools used within the HUBPL platform into a single report. It is primarily intended to be used to generate management reports, help to maintain Traceable, Verifiable, and Complete (TVC) compliance and to improve engineering team efficiency by streamlining reporting methods. Cases may be brought into the application and grouped by projects, entity (pipes), or independent Modules/Cases. The Report Builder also allows for any combination of two PDF or compatible picture files to be associated with each Case and includes them within the consolidated report.
Report Builder Workflow
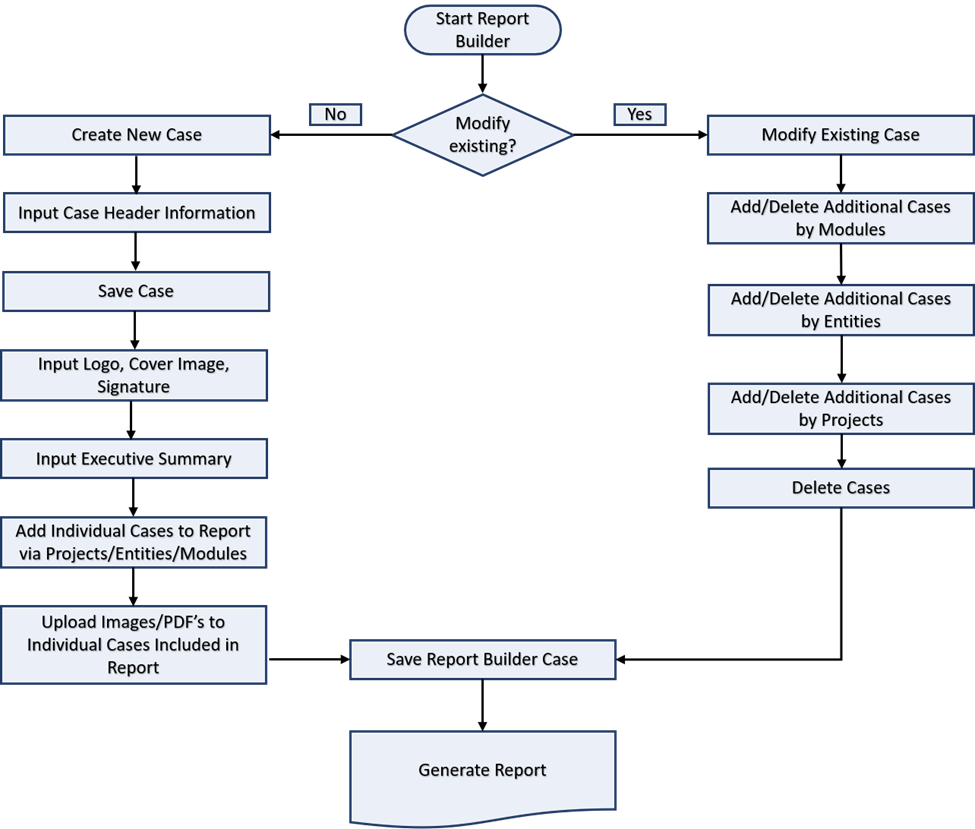
Interface Functions
Workflow – New Report
Select Report Builder from the main menu ribbon within the HUBPL application:
Select New Case, complete Case Header information, and click Save:

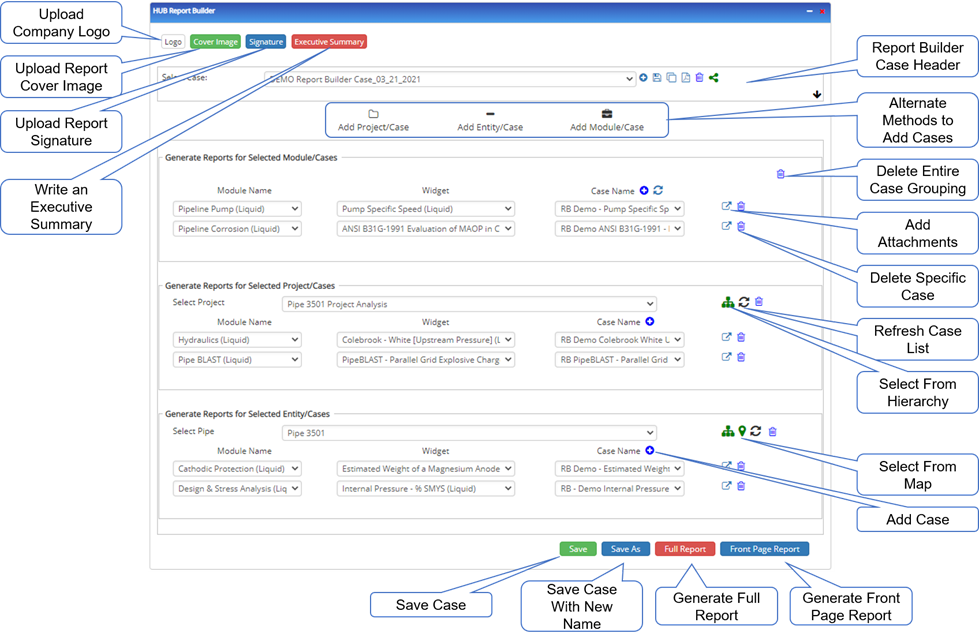
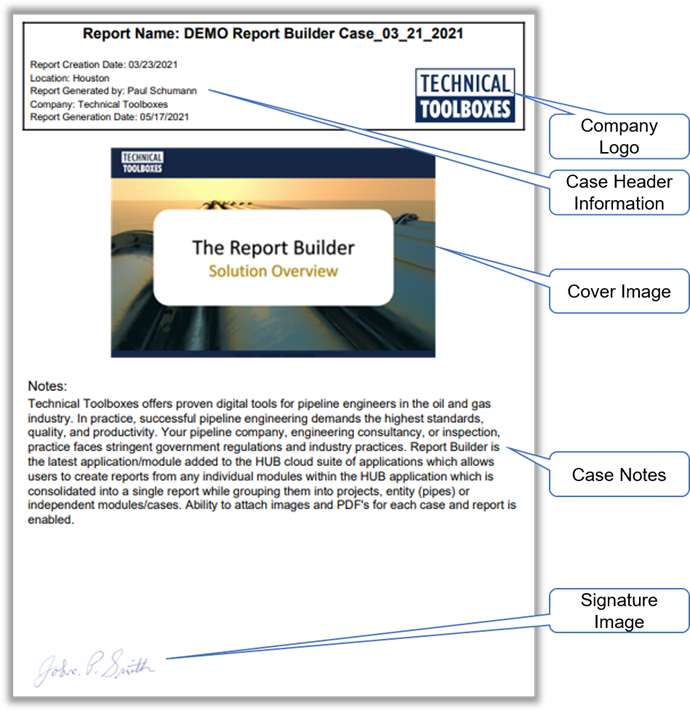
Add a Logo, Cover Image, Signature, and Executive Summary to the report by executing the steps below:
![]()
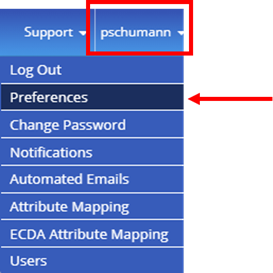
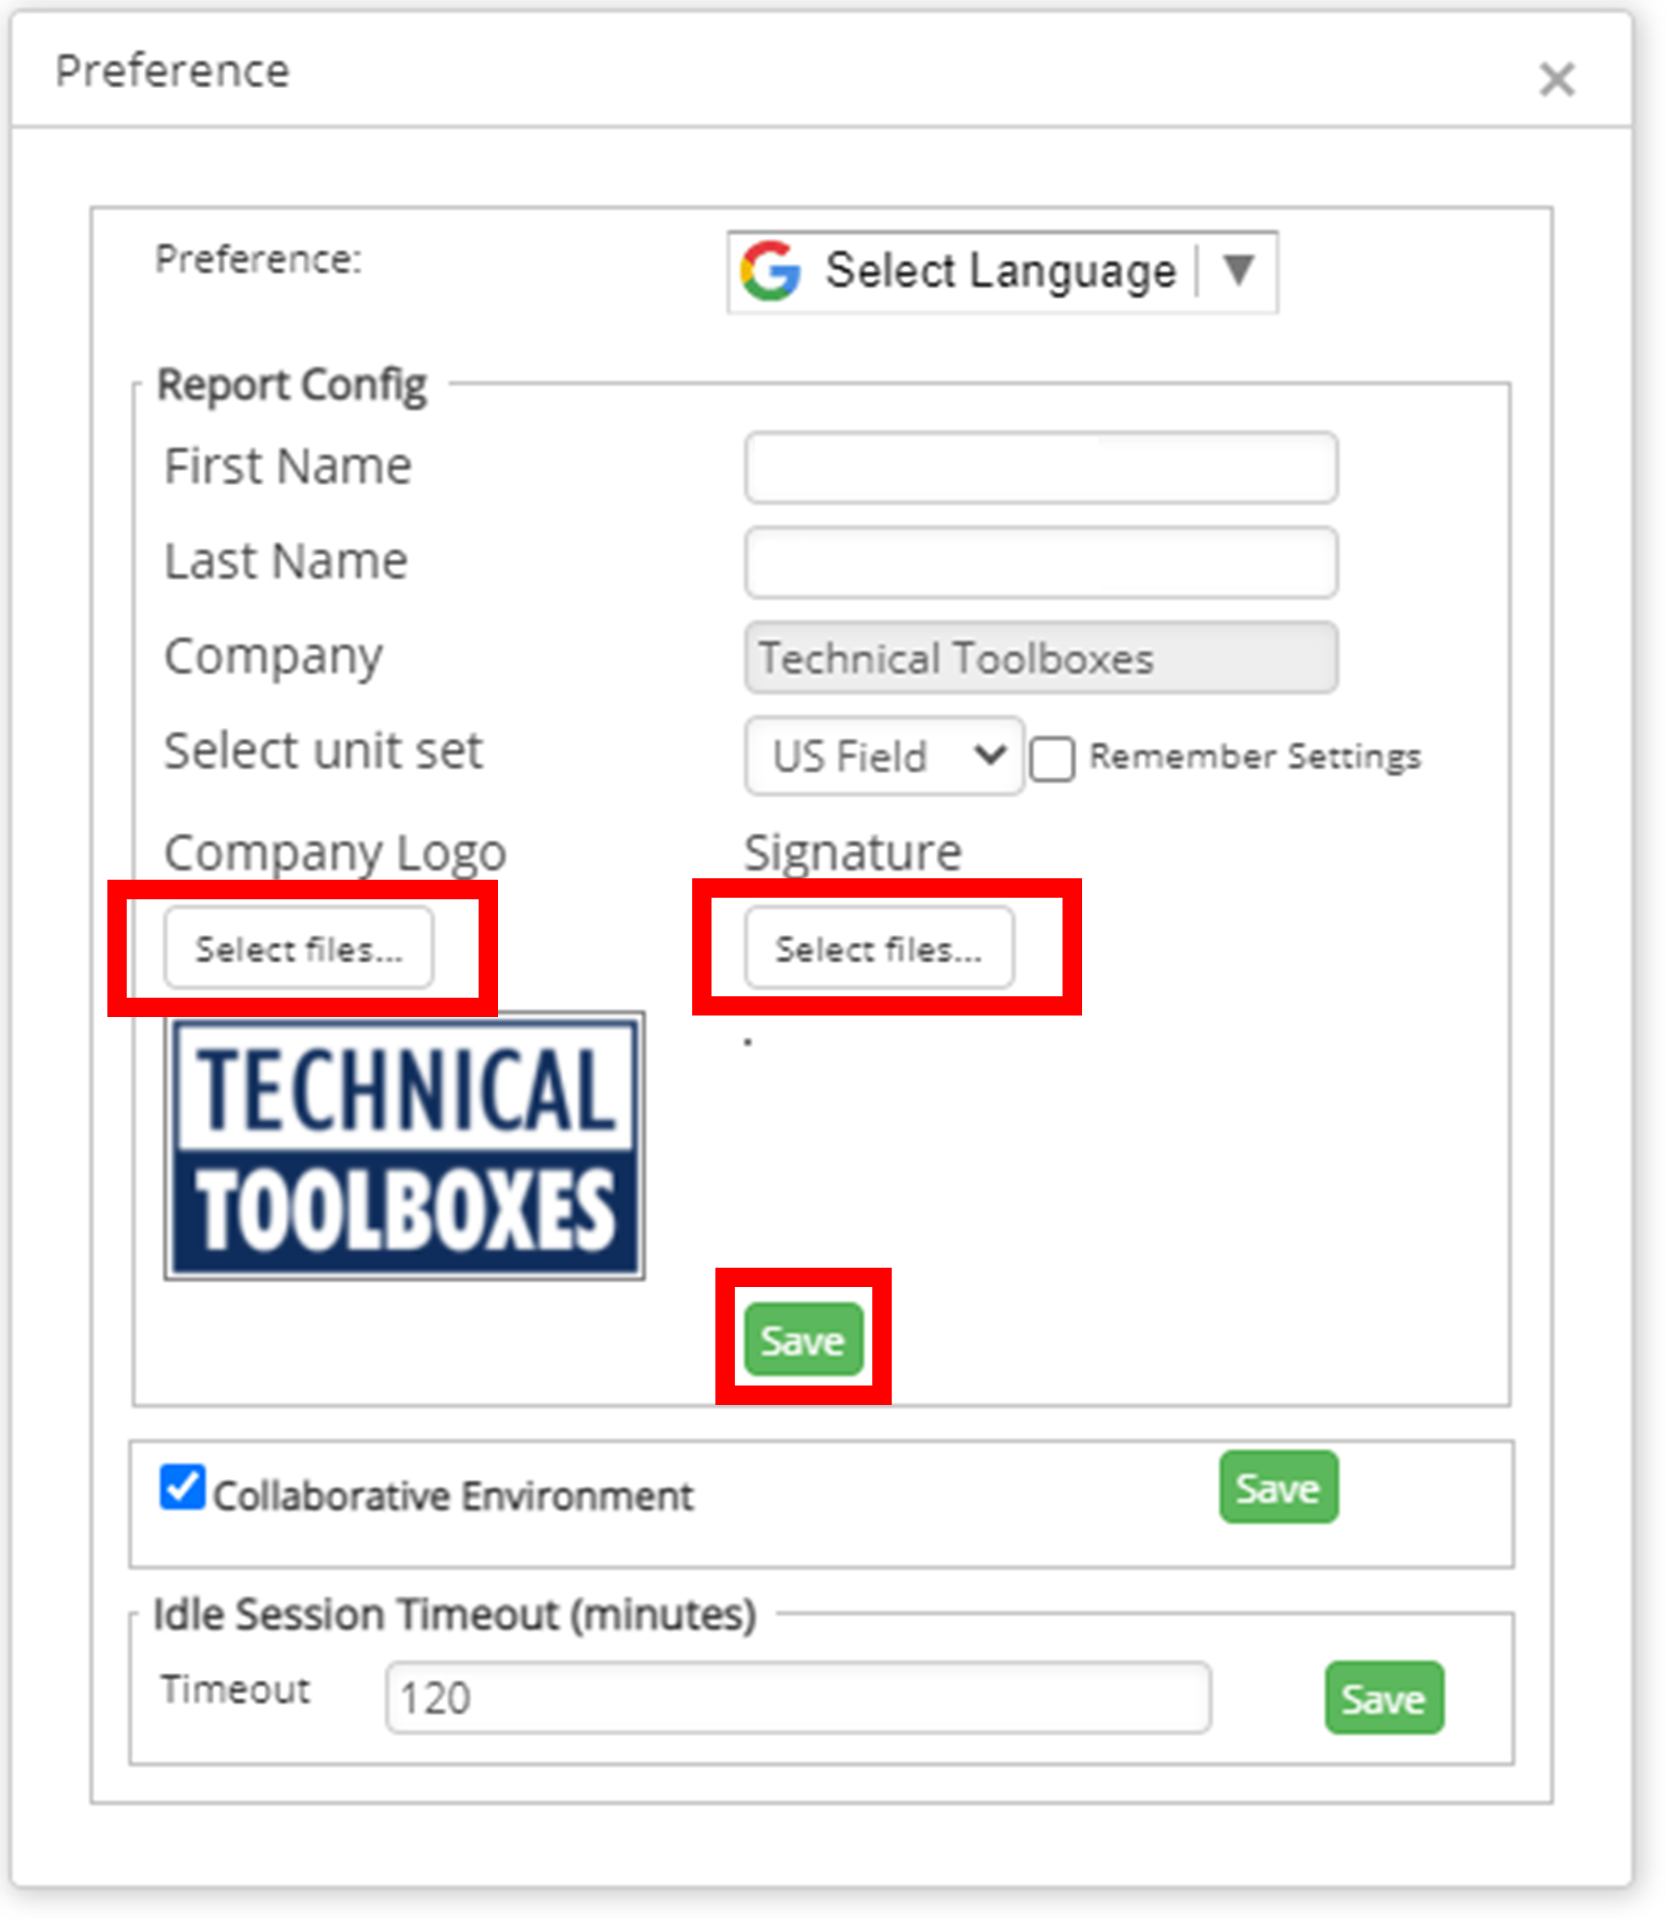
Include a Company Logo and Report Author Signature by uploading image files and selecting Save. In the example below, logo and signature files are added via the Report Builder Logo icon which launches the Preferences interface. This interface may also be launched by selecting Preferences from the main menu ribbon bar under the username:
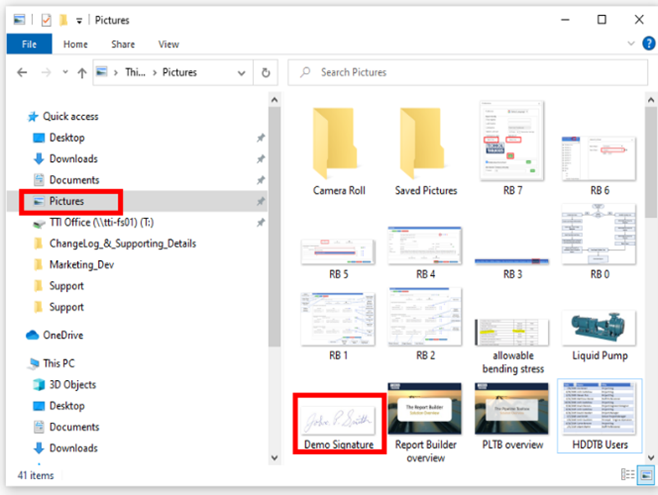
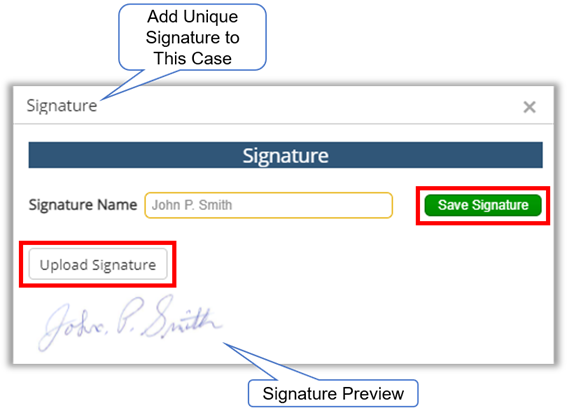
To upload a unique signature for the specific Report Builder Case, select the Signature icon, then Upload Signature, and finally Save Signature. Note: If no Signature file has been added to the specific report Builder Case, the application will default to any signature that is present in Preferences.
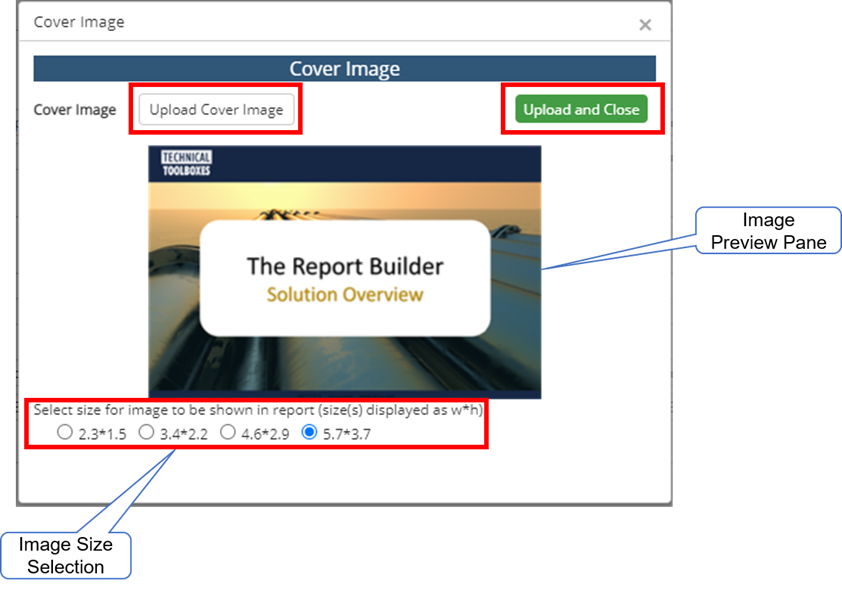
Upload a cover image for the report by selecting the Cover Image icon, selecting the Upload Cover Image icon, previewing the image, and selecting the size and finalizing by selecting the Upload and Close icon.
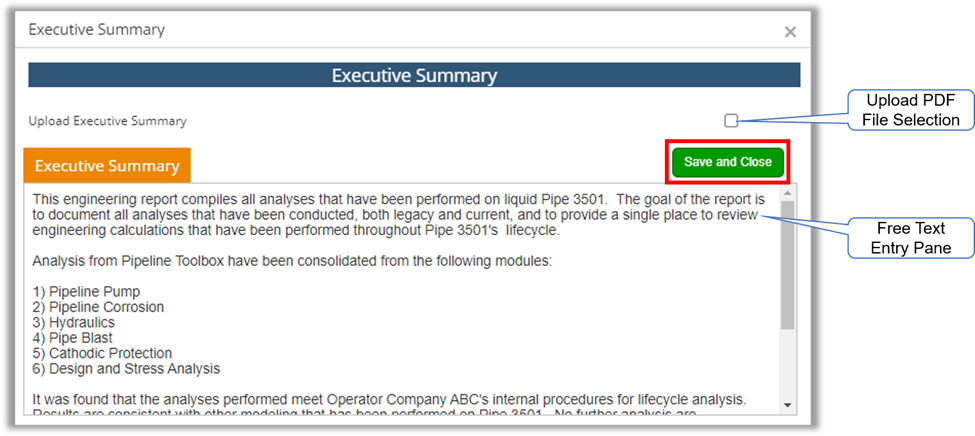
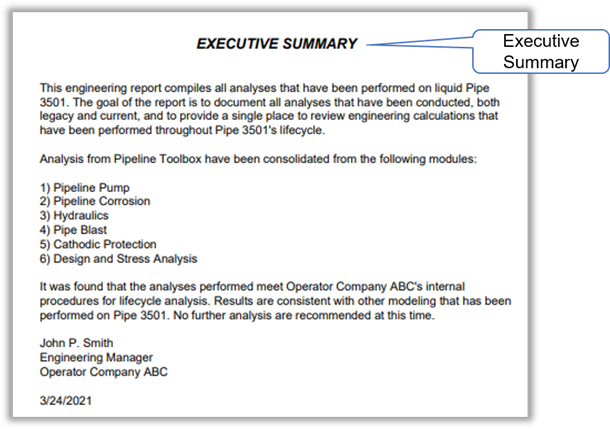
There are two methods in which the Executive Summary may be added to the Report Builder. The first is free text entry and the second is by uploading a PDF file as shown below. To include an Executive Summary, select the Executive Summary icon and utilize the images below for guidance.
For Free Text entry, simply leave the Upload Executive Summary checkbox unchecked, and fill in the Executive Summary field.
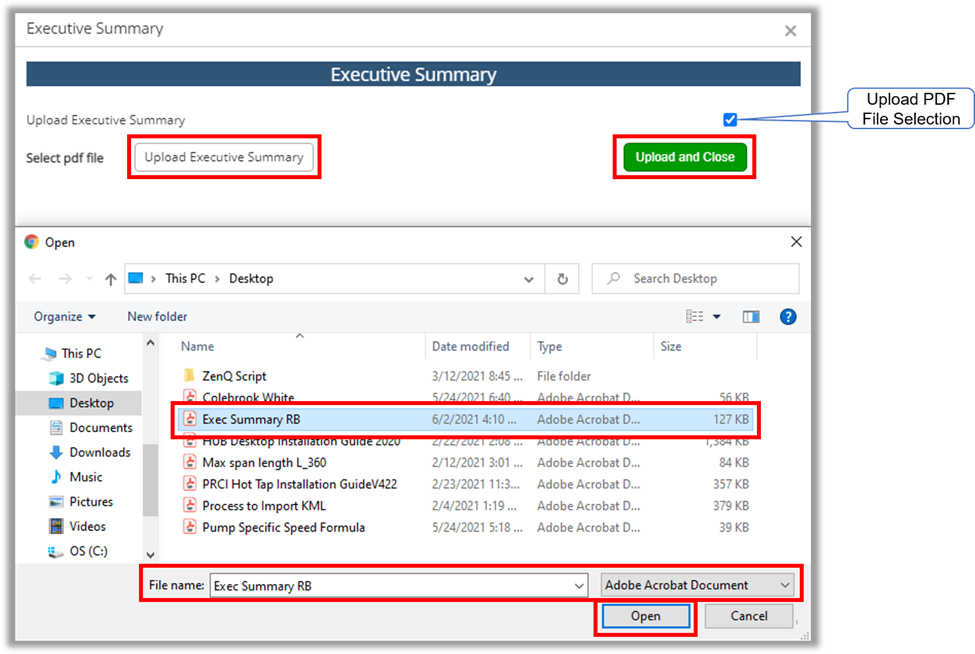
To upload a PDF File, select the Upload Executive Summary checkbox, select the Upload Executive Summary icon, select the file to upload followed by Open, and finally select the Upload and Close button.
To review the report Builder Front Page report, which includes all of the previous inputs, select the Front Page Report button at the bottom right hand section of the widget.

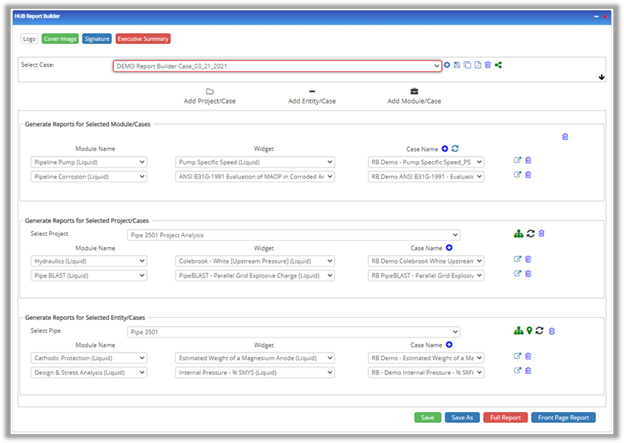
The next step is to populate the report with Cases to be included after the Front Page Report. There are three methods to group and bring Cases into the report. The first is to bring Cases in that are associated with the same Project. When using this method, once the project is selected, the Report Builder will list all Cases associated with that Project, after which Cases may be deleted from the report if all are not required for the final report. The second method is to bring Cases that are associated to a particular Entity (pipes). In this case the Entity is selected by either the Hierarchy or Map and any Cases that have been previously associated with the Entity will be listed. Again, if all Cases are not needed in the final report, individual Cases may be deleted. Finally, individual Cases that are not associated to a Project or Entity may be brought into the report on a one-by-one basis. The following instructions provide steps for each of the three methods noted above.
The order in which Case reports show up in the final report is a function of the grouping order and the sequence that Cases are brought into the group. First, users should decide the order of the grouping (by Individual Module Cases, by Project, by Entity in the case of the instructions below, or any combination thereof). Within each group, the reports will be generated in the order of Case selection within the group (to case being first, bottom Case being last).
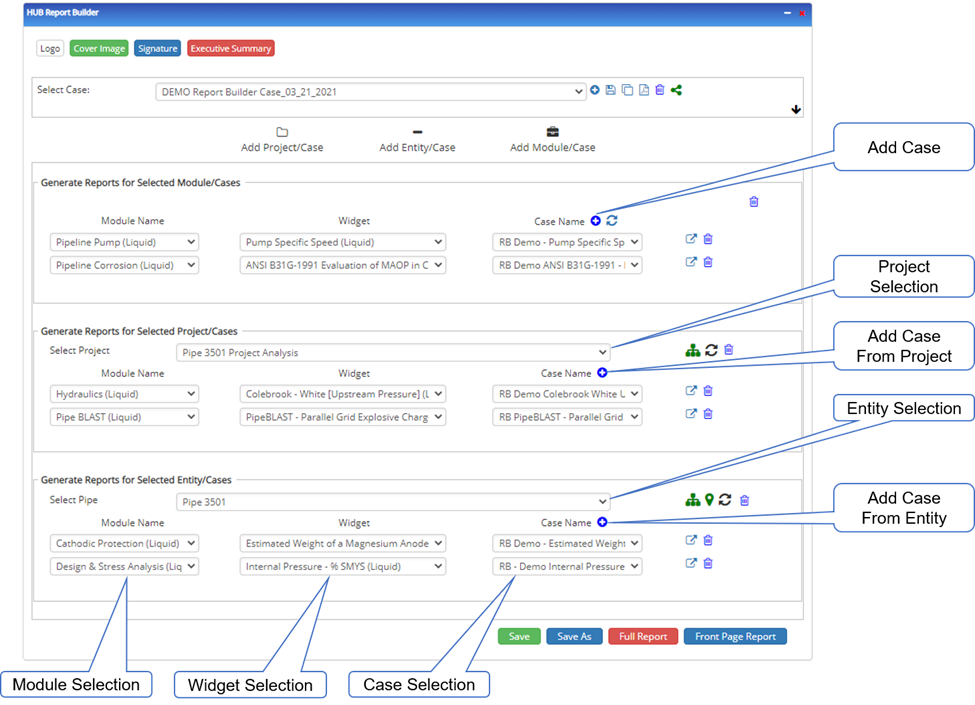
Add Individual Cases by Module
To add individual Cases by module, select the Add Module/Case button which will allow for selection of any Cases created by you, or that have been shared with you via the collaborative feature in the Case Header.
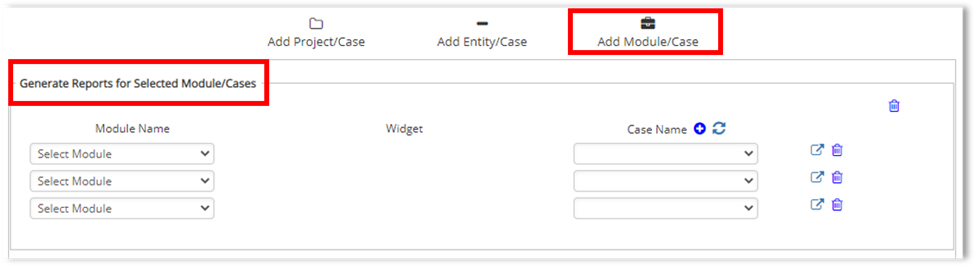
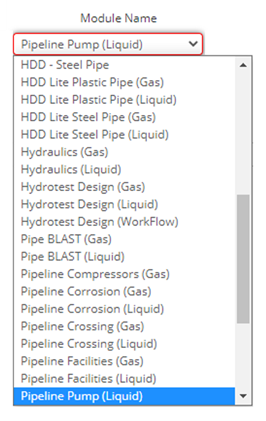
To add a Case, select the module name from the dropdown list. Once this is complete, the widget list will populate and the widget selection is made next.
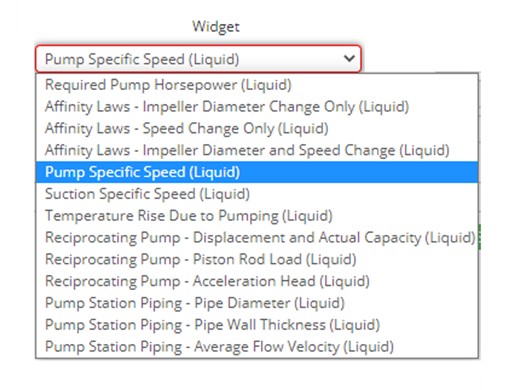
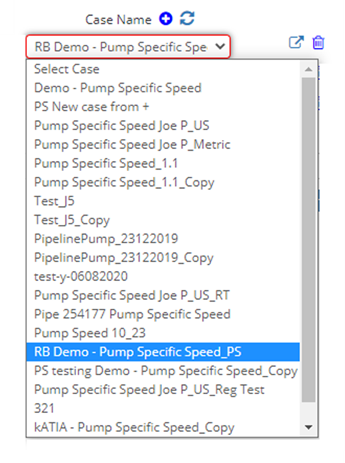
Finally select the individual Case that will be included in the report via the Case dropdown menu, which is populated with all Cases that exist for the module and widget selected in the previous steps.
Repeat the steps above to add additional Cases via module. In the figure below, four new placeholders for Cases to be included in the report have been added by selecting the Add Individual case button. There is no limit to the number of Cases that can be added using this method.
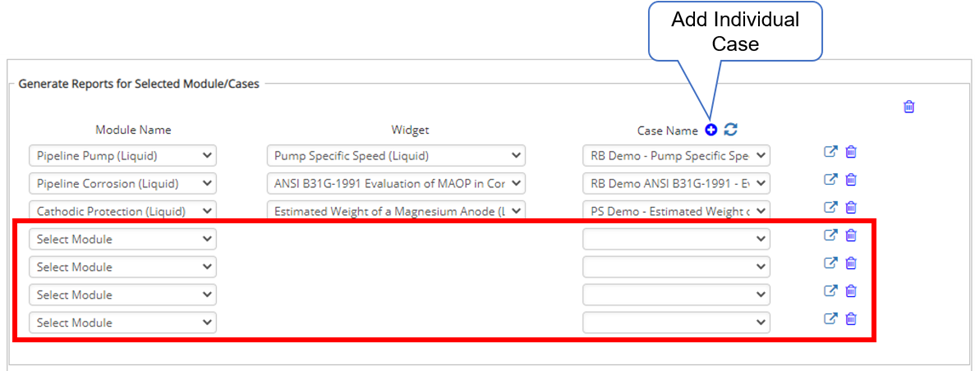
To delete Case(s) from the report, select the Delete icon to remove individual Cases from the grouping.
Add Cases by Project
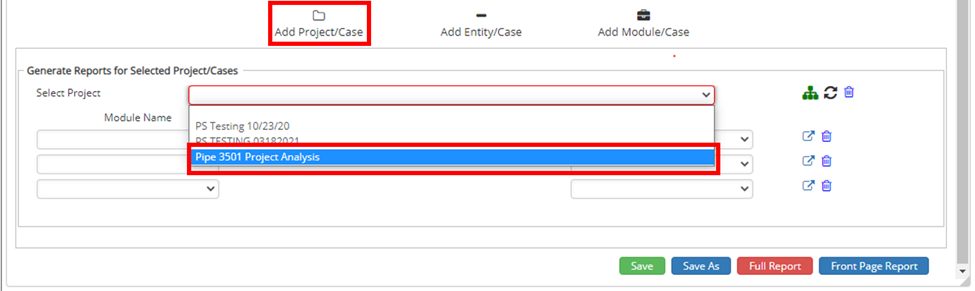
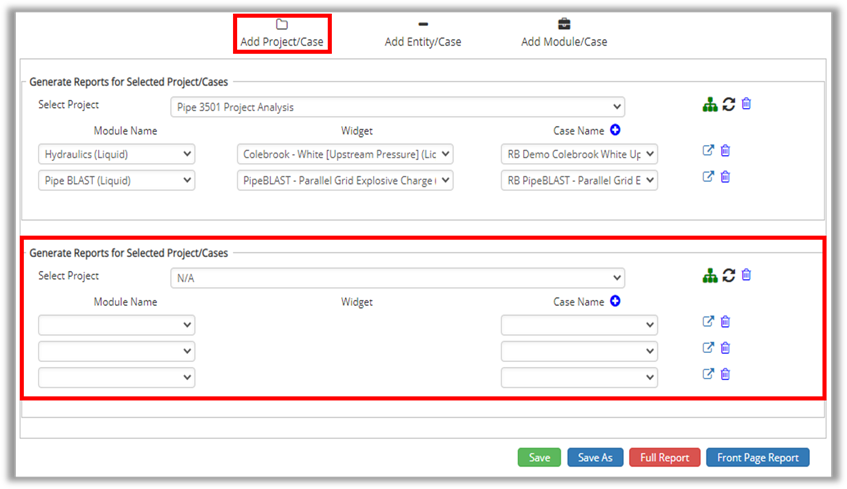
Select the Add/Project Case icon and then select the Project that contains associated Cases to be included in the report. All Modules/Widgets and Cases will auto-populate with all Cases that have been associated with the Project via the Project field in the Case Header.
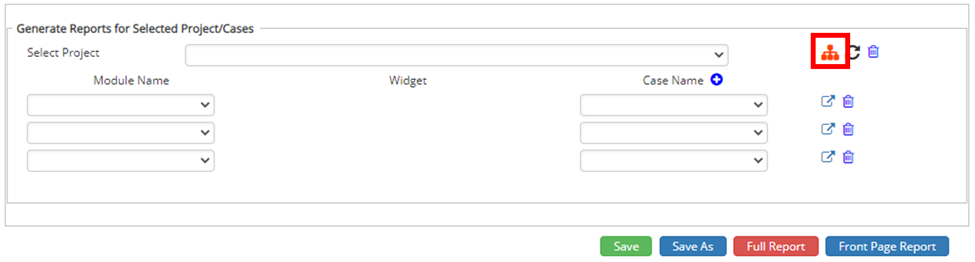
Alternatively, the Select Project field may be filled in by direct selection of the Project from the Hierarchy (HUBPL add-on). First ensure that the Hierarchy is organized to have Project listed as the last level. For the below example, two levels are shown: Company and Project.

Next, select the Hierarchy icon and it will turn from green to red, indicating that it is active and ready for the entity Project selection within the Hierarchy.
Select the project name from the Hierarchy, after which all Cases associated with the project selected will be brought into the grouping. In this case, the project named “Pipe 3501 Project Analysis” contains two associated Cases.
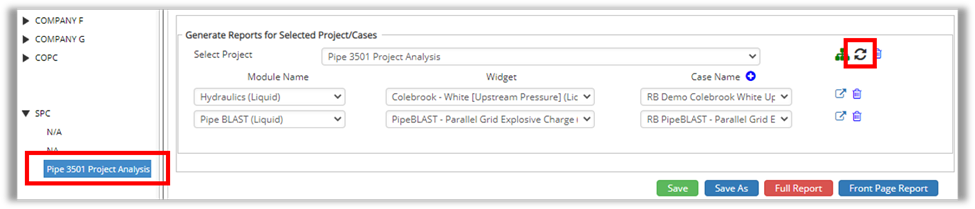
If there are additional Cases that should be included with the “Pipe 3501 Project Analysis” project, the user will need to navigate to those specific Cases and update the Case Header to include the project information. Once this is complete, click on the Refresh Case List icon to view the revised Cases within the Case Name List.
To add Cases from one or several additional projects, simply select the Add Project/Case icon and populate the group as described above.
To delete any Project related Case(s) from the report, select the Delete icon to remove individual Cases from the grouping.
Add Cases by Entity
The last method by which Cases may be added to the report is by their association with Entities (Pipes). Pipes are considered entities and are listed in the Hierarchy, and visually present on the Map. Cases can be associated to an Entity in the Case Header through either the Map or the Hierarchy features as shown below. As both Hierarchy and Map are HUBPL add-ons, thus this method to add Cases to the report is not available without the appropriate license.
Associating Cases to Pipes via Map or Hierarchy
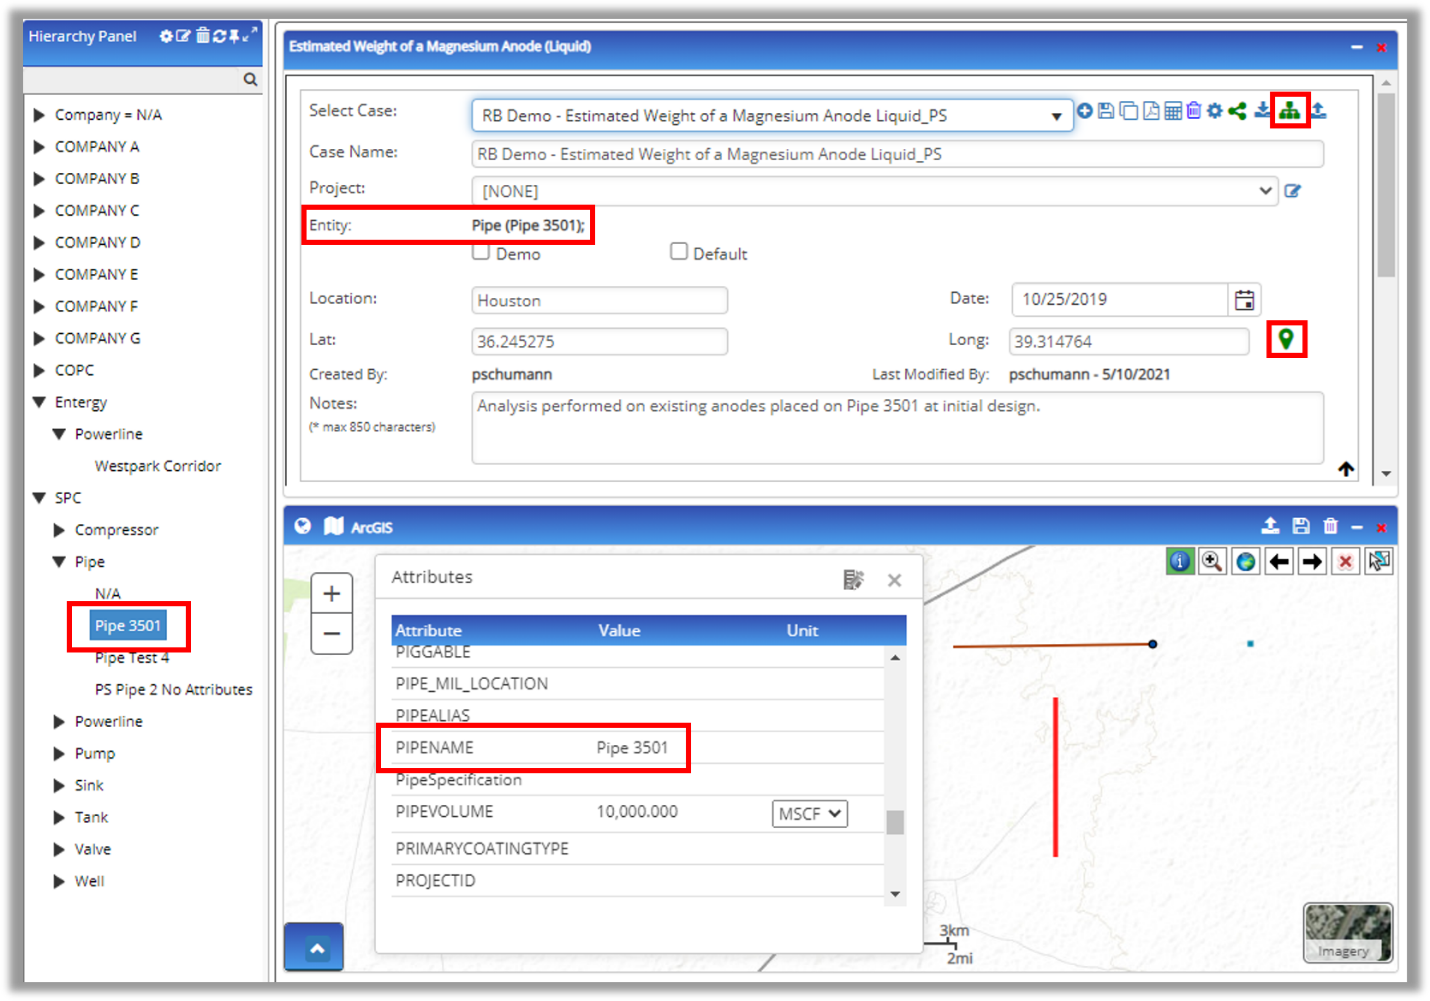
Refer to the image below when completing the following steps:
- To associate a Case to a Pipe via the Map, open the specific Case and Map and center the map on the pipe that will be associated with that Case.
- Click on the Select from Map icon and it will turn red, indicating selection of the Pipe in the map is active.
- Select the Pipe on the Map and Save the Case.
- The Pipe will now be displayed in the Case Header in the Entity field.
Refer to the image above while following these instructions:
- To associate a Case to a Pipe via the Hierarchy, configure the Hierarchy settings such that Entity is listed as the last level.
- Expand the Navigator list to show all Pipe names that are in the data set.
- Open the Case that the association will be made to.
- Click the Select From Hierarchy icon and it will turn red, indicating selection from the Hierarchy is active.
- Select the Pipe from the Hierarchy list and Save the Case.
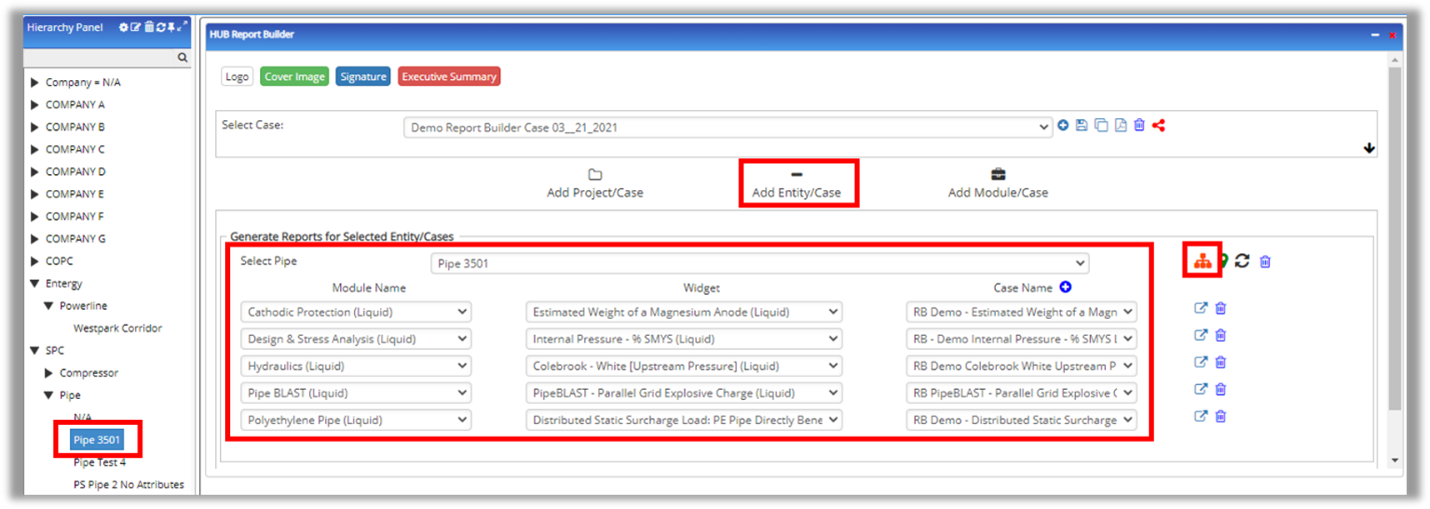
Now that Cases have been associated with Pipes, Cases may be added to the report via specific Entity (Pipe). Select the Add Entity/Case icon, followed by the Select from Hierarchy icon, and then select the pipe from the Hierarchy panel. Notice that all Cases which have been previously associated with this Pipe will automatically populate within the Report Builder.
To add additional Case(s) from a different pipe via Entity, simply select the Add Entity/Case icon and repeat the previous steps.
To delete any Case(s) from the report, select the Delete icon to remove individual Cases from the grouping.
The second method to add Cases that are associated with Entities is via selection on the Map:
- Open the map and zoom to the pipe with associated Cases.
- Select the green Select from Map button in the Report Builder
- The icon will turn from green to red to indicate selection from the Map is active.
- Next select the Pipe (Pipe 3501 in this Case).
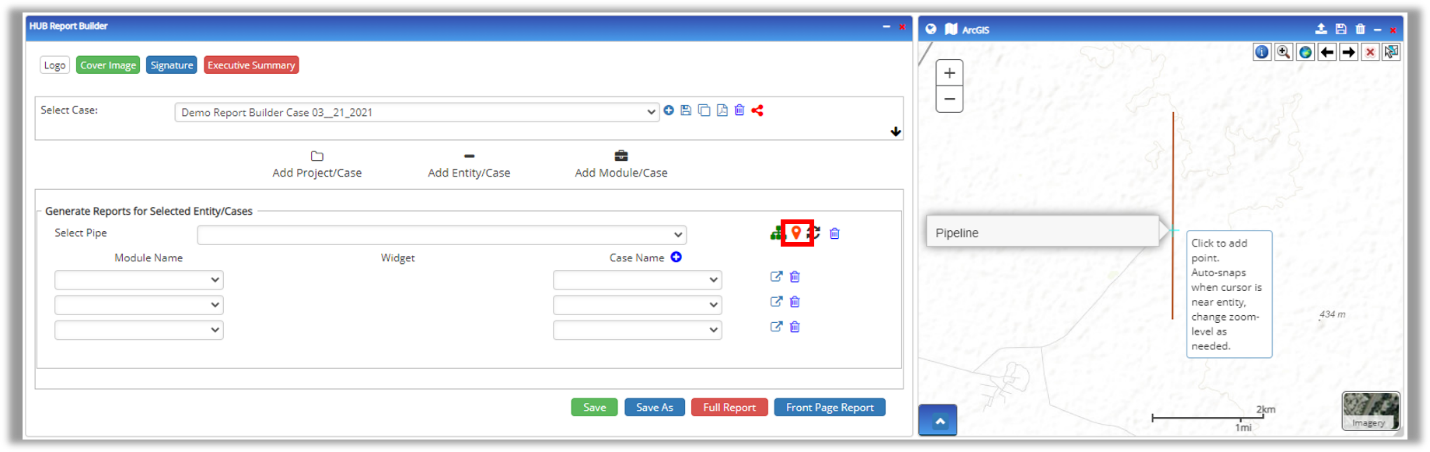
All cases that have been previously associated with this Pipe will automatically populate within the Report Builder similar to the loading of Cases via the Hierarchy. The below figure shows the fully completed example where Cases included those that were loaded using the three methods described above: Individual Modules, Project, and Entity groupings.
Adding Images and/or PDFs for Inclusion in Case and Report
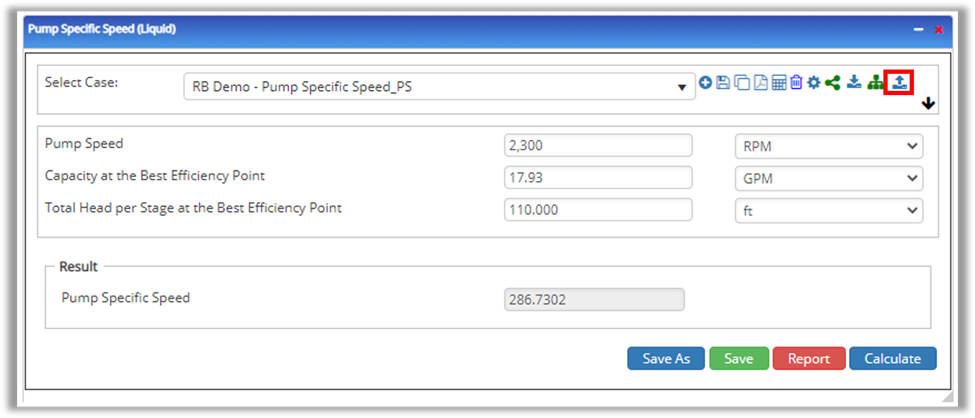
The Report Builder allows for up to 2 image/PDF files to be included in the report for each Case. The files are added to individual Cases and may be chosen to be included or excluded from both Case and Report Builder reports. To add images or PDFs, select the launch Case icon next to the specific Case to which image files or PDFs will be included. After the Case loads to the canvas, select the Image Import icon as shown below.

The below image describes the key functions within the Image Import interface. The interface has tow areas, side by side, which provide features to Import files. Combinations of file types include one image or PDF file, two PDFs, two image files, or one PDF and one image file.
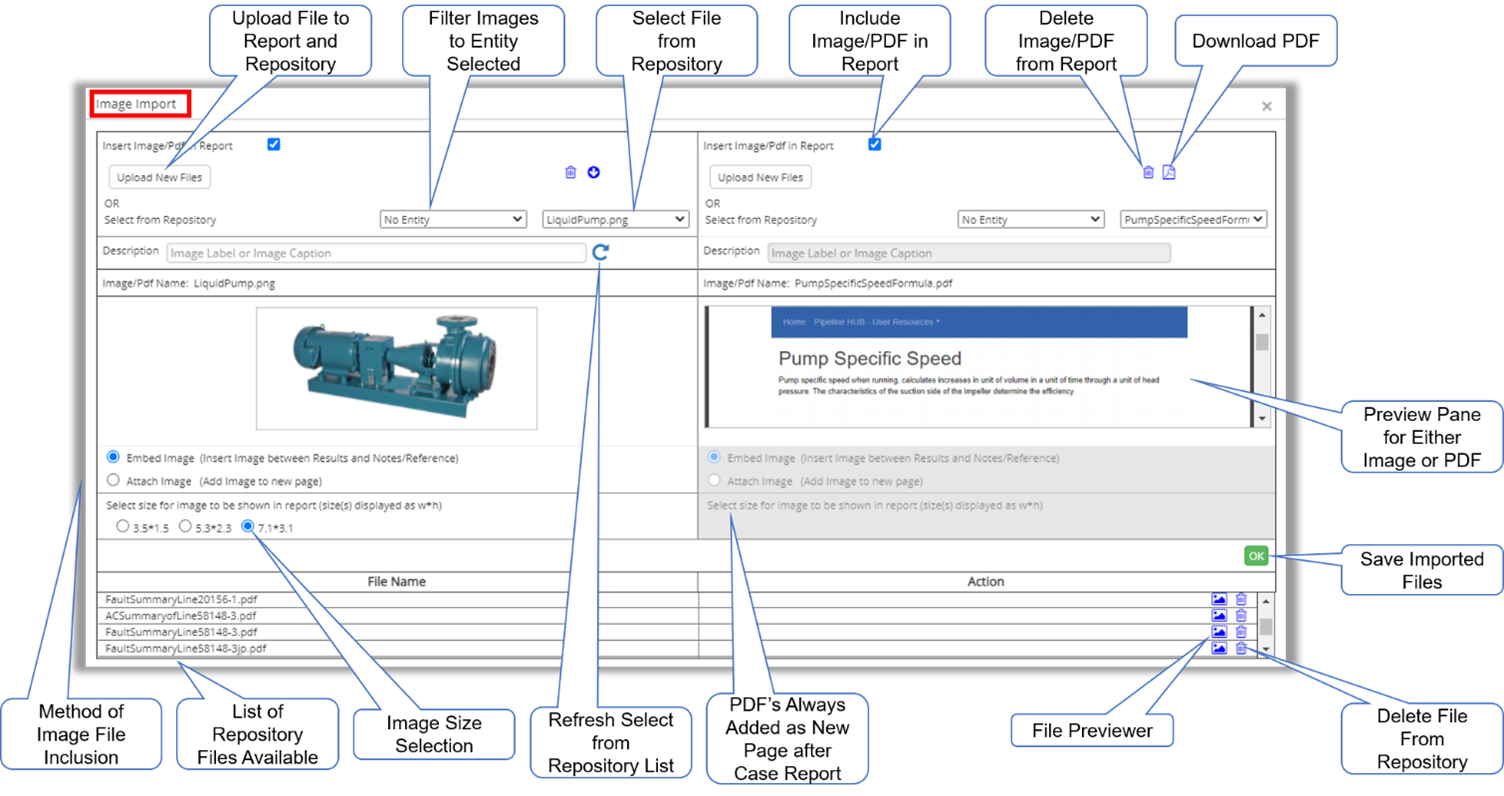
There are two methods to add image files/PDFs: Upload new files or select from existing files in the Report Repository.
Importing through the Report Repository
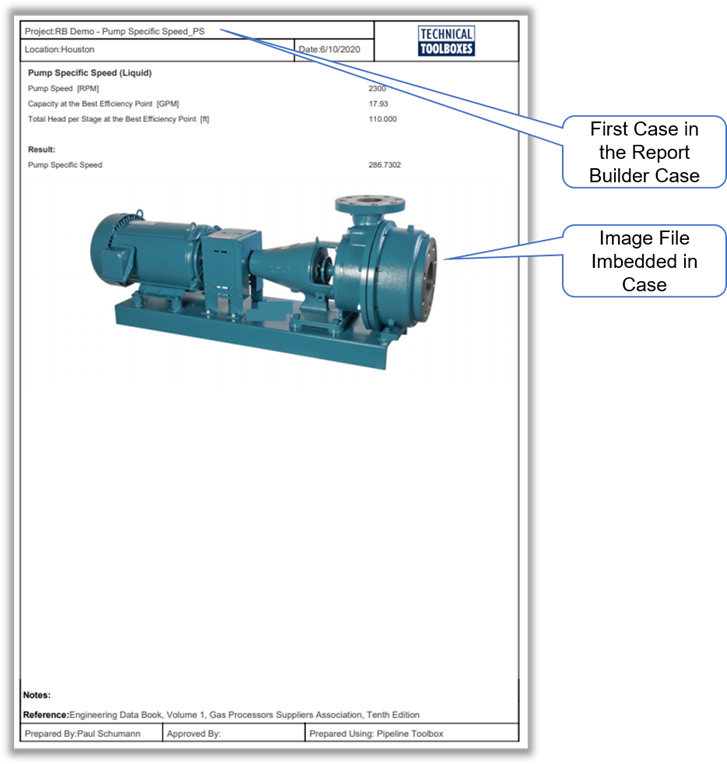
The first method is to select an existing file/PDF from the Report Repository, which contains any image that has been uploaded by any user in your company previously. In this example, an image of a pump has been selected from the Repository, and a preview is shown above. To aid in file selection, a previewer is available by selecting the File Preview icon.
- Use the above image for feature definition and location within the interface.
- If filtering files by Entity, select the Entity using the Entity Filter dropdown list.
- Next, select the file for inclusion from the Select File dropdown.
- Review the Preview Pane to verify the selection.
- Note that image files may be embedded within the Results and Notes sections of the individual Case report, or as an attachment in which the image will be included on a new page after the Case report.
- Select the OK icon to save the imported file.
Uploading a New File to the Repository
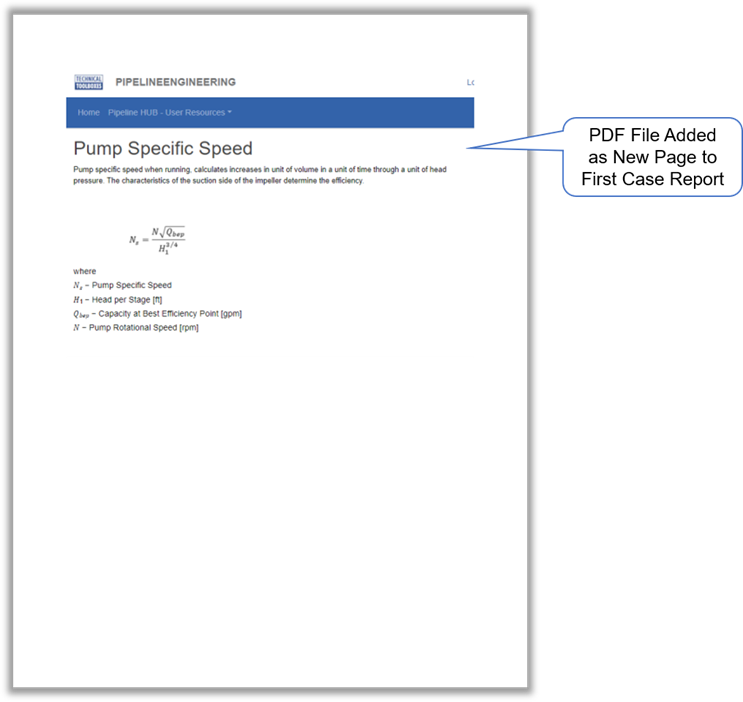
The second method is to upload a new file to the Case/Repository. In this example, the Pump Specific Speed Formula is a PDF file that will be added to the Case, and the PDF will be added to the Repository for later use by anyone in the user’s company. Use the above image for feature definitions and locations within the interface.
- Select the Upload New Files icon to import new files.
- Select the file to be included in the Case/Repository.
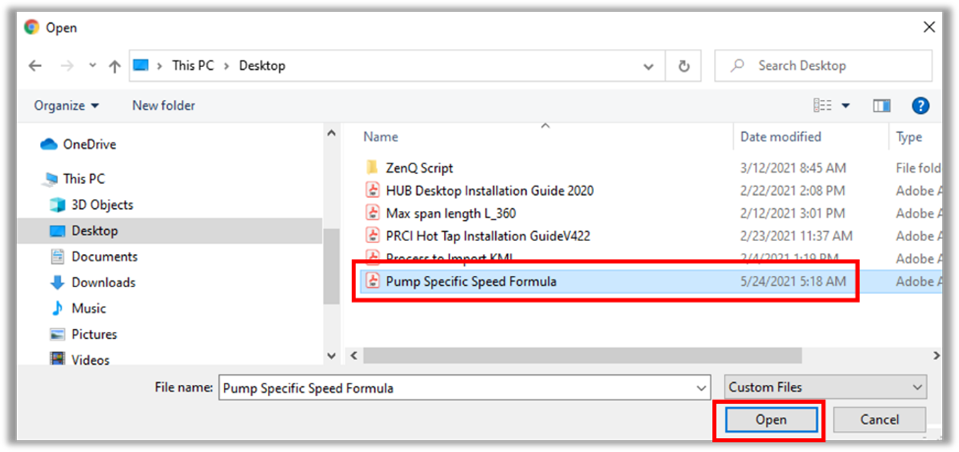
- Review the Preview Pane to verify the selection.
- Select the method of inclusion. Note that the PDF files may only be added as an attachment that will be included after the individual Case report and cannot be included within the individual Case report.
- Select the size of the image.
- Select the OK icon to save the imported file.
Select Save upon completion/inclusion of:
- Company logo
- Cover image
- Signature
- Executive Summary
- Cases via Module/Widget
- Cases via Project
- Cases via Entity
- Image/PDF files to individual Cases
Generate Full Report
With the Report Builder widget open on the Canvas, close out any other widgets that may be present.
Select the Full Report icon. Depending on the number of Cases and images/PDFs included in the Report Builder Case, generation of the report may take a few moments as the software consolidates each Case report with the Front Page Report.
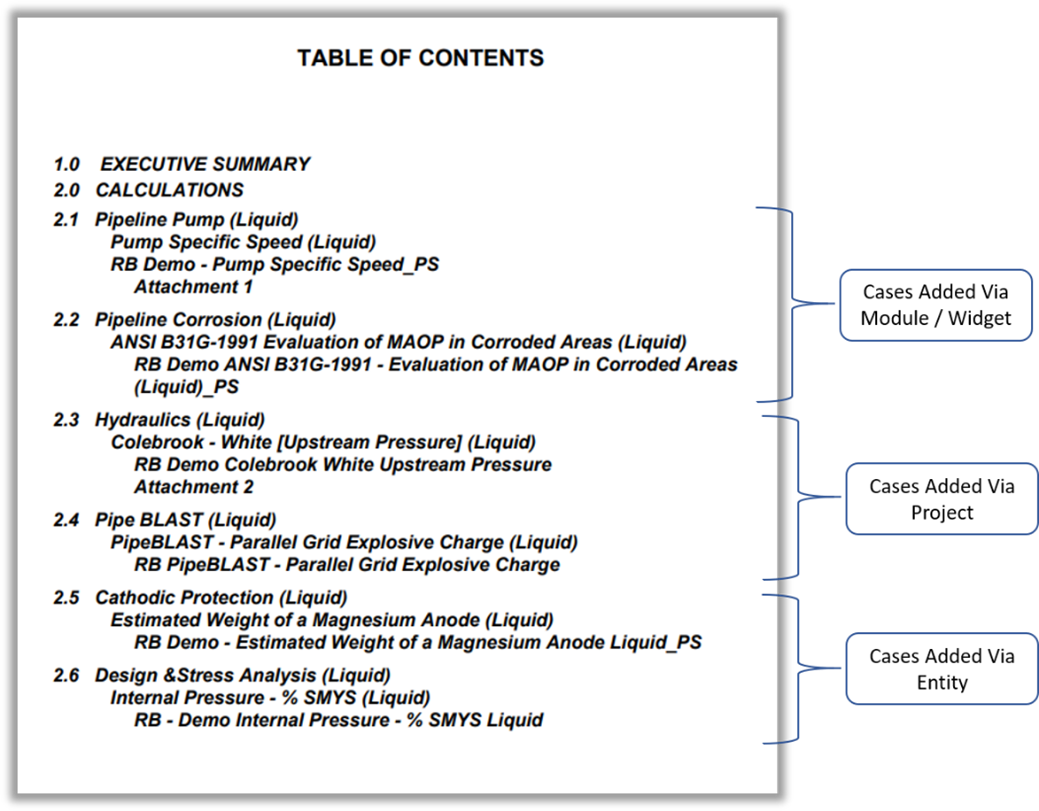
Upon completion, the consolidated report will be displayed in a new browser tab with contents in the following order – refer to the images below:
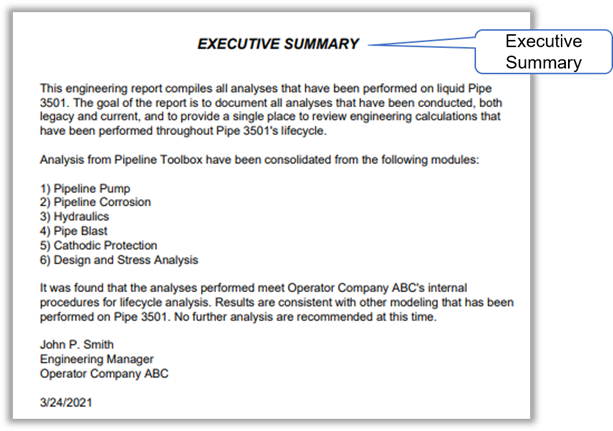
- Front Page Report with an automatically generated Table of Contents inserted between first (Report Builder Case information) and last page (Executive Summary) of the Front Page Report.
- Individual Case reports with images either embedded in the Case report or as an attachment, and PDF files added as attachments. In the example below, only the first case includes an image and PDF. The second Case report (shown below) does not include images or PDFs.
- The remaining 4 Cases (not shown here) will be ordered first by grouping order, then by Case order within the group (Cases are viewed in the widget from top to bottom).


Workflow – Modify Existing Report
Refer to the image below for features related to modifying an existing report.
- To add Cases or groupings of Cases, use the instructions in Workflow – New Report above.
- To delete Cases from groupings within the report, select the Delete Case icon.
- To delete groupings of Cases from the report, select the Delete Group icon as shown below.
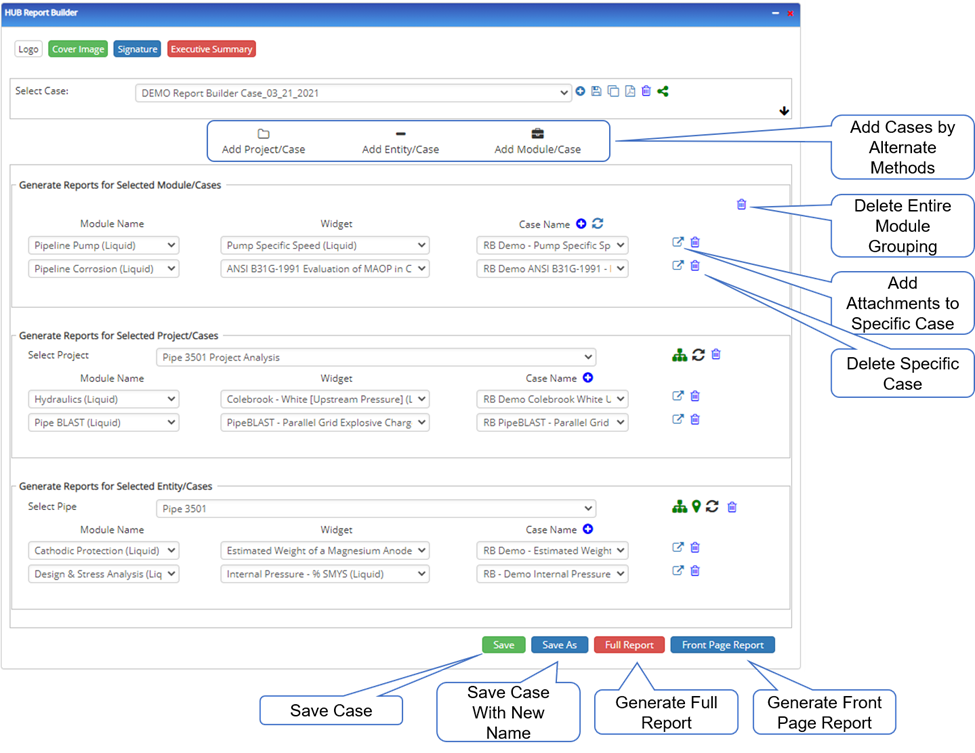
- Select the Full Report or Front Page icons to view each report.
- Select Save icon to Save Report Builder Case.
- Select Save As to duplicate a copy of existing Case contents but with a different Case name.
Related Links
Table of Contents
Table of Pages
- Pipeline HUB User Resources
- AC Mitigation PowerTool
- API Inspector's Toolbox
- Crossings Workflow
- Horizontal Directional Drilling PowerTool
- Hydrotest PowerTool
- Pipeline Toolbox
- PRCI AC Mitigation Toolbox
- PRCI RSTRENG
- RSTRENG+
- Ad-hoc Analysis
- Database Import
- Data Availability Dashboard
- ESRI Map
- Report Builder
- Crossings Workflow
- Hydrotest PowerTool
- Investigative Dig PowerTool
- Hydraulics PowerTool
- External Corrosion Direct Assessment Procedure - RSTRENG
- Canvas
- Definitions