User Interface
Launch River-X Widget
When the user has logged in to the Hub, River-X can be accessed from the Crossing Tools and PRCI Apps dropdowns, as seen in the images below:


Main Widget
Once River-X is selected, the widget is displayed in the canvas and loads with a default case as an example executable case.
A Case includes a collection of data for a specific condition with explicitly defined parameters and is used to perform required analyses to assess the integrity of the exposed pipeline for the given input data.
Cases can be assigned to an Entity, which contains one or more Cases that the user intends to keep and document as a collection. For example, the base case and sensitivity cases for a specific pipeline can be saved to an Entity. Another example could be a user wanting to save all cases from a specific client (which can be for different pipelines) in an Entity.

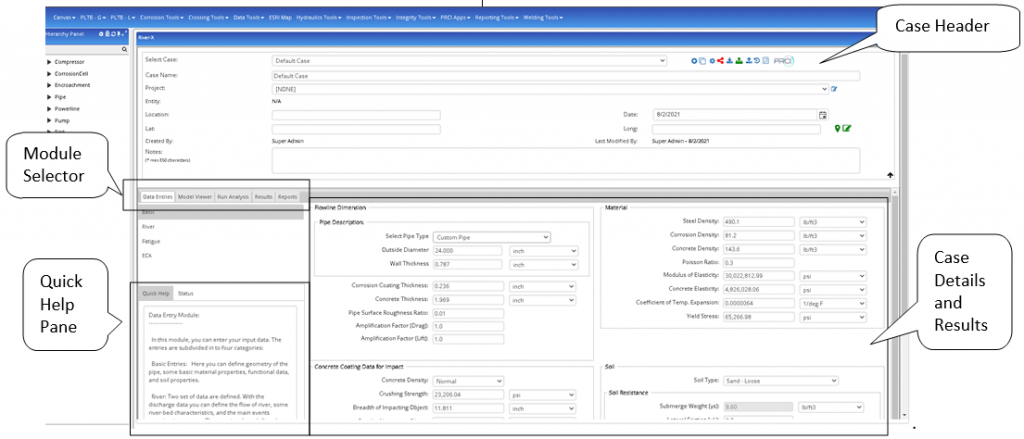
Case Header
The case header includes project operations (New Project and Open Project) as we as case operations (creating, copying, deleting, saving and editing, changing units, importing pdf/images, generating report, calculating, toggling collaborative on, reporting hours, and adding to report repository are accessible in the toolbar).
Quick Help Pane
Guidance on the selected input parameter is shown in the Quick Help Pane. This help pane shows the relevant information when the user is in the “Data Entries” module only.
Modules Selector Menu
This menu allows the user to navigate between the program’s modules. Each of the mudles are explained in detail in the Modules section.
Unit
The Unit selector changes the unit system to SI (Metric) or English (Imperial/US Field) based on the selected option. The values of the input data will be converted to the selected unit system if the unit is changed. The results will be generated based on the selected Unit system. Changing the unit system in the Reports module does not change the units/values unless the report is regenerated by clicking the “Create Report” button.
Case Details/Results Area
The Case Details area, as show in the above diagram, constitutes the majority of the program interface. The details of the selected (current) case are presented based on the active module. These include input data, model information, analyses results, and reports. In some modules, additional shortcuts or pop-out windows are available to use. The details of each module are presented in the “Modules” section.
Modules
The software workflow has been divided into a number of modules:
Related Links
Table of Contents
Table of Pages
- Pipeline HUB User Resources
- AC Mitigation PowerTool
- API Inspector’s Toolbox
- Crossings Workflow
- Horizontal Directional Drilling PowerTool
- Hydrotest PowerTool
- Pipeline Toolbox
- PRCI AC Mitigation Toolbox
- PRCI RSTRENG
- RSTRENG+
- Ad-hoc Analysis
- Database Import
- Data Availability Dashboard
- ESRI Map
- Report Builder
- Crossings Workflow
- Hydrotest PowerTool
- Investigative Dig PowerTool
- Hydraulics PowerTool
- External Corrosion Direct Assessment Procedure – RSTRENG
- Canvas
- Definitions
